How to Hook Redux in a React App
Use the new Redux hooks to build a food ordering app. Learn UI patterns like fetching data from API, adding items to cart, and applying filters.

Link to this headingWhat we'll be building
Take a look at this app. We show a list of food items which a user can add to their cart. They can filter the items based on Veg or Non Veg. They can also increase or decreate the quantity of an item. We show them the price they have to pay in a button on the bottom.
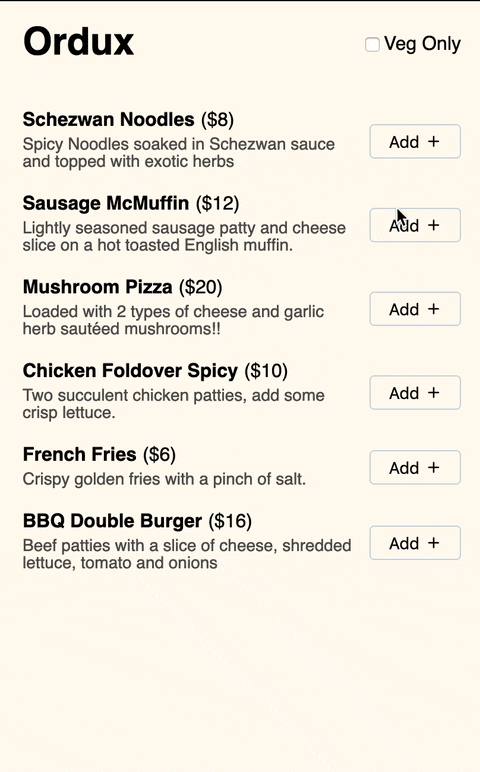
It's also hosted on https://redux-hooks-tests.netlify.app/ so you can try it out there.
Link to this headingApplication Overview
Just like traditional SPAs, we show a loader till the API finishes and then we show the menu to the user. This is how this particular feature works in our React + Redux app.

If you are familiar with Redux then you’ll notice that the new thing with Redux hooks is that we don’t get store data from connect HOC. Instead we use the useSelector hook. Similarly we get dispatch from useDispatch hook.
This talk from Sophie and Dan already covers when hooks are better than HOCs so I won’t gush about it too much. One side-benefit I feel is that now only parent sends data in props. All other data comes from hooks so its easier to find the root cause of a bug.
Let’s now move towards the actual implementation. Our app has two main files- redux.js and App.js which we’ll cover in detail. However there are some UI components present in Comps.js file to make this app work which we’ll peek through in the next article.
You can check all the code for this app on GitHub.
Link to this headingredux.js file
This file contains the ACTIONS mapping, the foodReducer and the Redux store creator. If you only care about how to use the new Redux hooks then skip this section and go to the next section where we discuss App.js file.
Link to this headingActions mapping
By having an object called ACTIONS we get to quickly know what all actions are possible and it also helps with auto-completing action types.
export const ACTIONS = {CHANGE_DIET: 'CHANGE_DIET',LOAD_MENU: 'LOAD_MENU',ADD_TO_CART: 'ADD_TO_CART',REMOVE_FROM_CART: 'REMOVE_FROM_CART',};
Link to this headingFood Reducer
As you must have heard a million times the job of a reducer is to return a new state based on the type of dispatched action.
We assign an initial state to foodReducer which looks like this-
const initialState = {diet: 'all',menuById: {},menuIdList: {all: [],veg: [],},cartByIds: {},}function foodReducer(state = initialState, action) {// rest of the code}
Before we proceed further let’s look at our foodReducer in action in this video.
Check how actions update store in Redux DevTools
You’ll notice that the actual data about each food item is stored by its id in the menuById key of the store. The menuIdList array only contains a list of ids per diet. There are three main benefits of storing data this way-
- Reduce duplicate copies — If we had stored data directly in arrays then some food items would be duplicated in both all type and veg type.
- Faster item access — Since we’re storing stuff by id, if we know the id accessing it will happen in O(1) instead of digging through an array which in best case scenario is O(log n).
- Filter results get cached — Suppose we get the items for a diet via an API call. We can cache the food item ids per diet so that when user selects a diet again we can pick the ids from cache instead of making an API call.
This technique is called normalization.
Similar to this cartByIds only store a mapping of item id and its quantity. The only downside is that we can’t just directly show data of store to user we’ll need to do some pre-processing to mold the data into the shape the various views requires. We’ll cover this when we talk about selectors.
Now let’s write the logic for CHANGE_DIET action in the reducer.
function foodReducer(state = initialState, action) {switch (action.type) {case ACTIONS.CHANGE_DIET: {const { diet } = state;const newDiet = diet === 'veg' ? 'all' : 'veg';return {...state,diet: newDiet,cartByIds: {},};}// other cases}}
Here we get the current value of diet from the store and then return a new state which has only two differences- The diet value is opposite of the previous one and the cartByIds is empty.
Notice that our reducer contains the actual toggling logic and is not treated as a dumb layer just to store whatever data comes in action payload.
Next, we have to deal with LOAD_MENU action.
case ACTIONS.LOAD_MENU: {const { menu } = action.payload;const menuById = {};menu.forEach((item) => {menuById[item.id] = item;});const allMenuId = menu.map((item) => item.id);const vegMenuId = menu.filter((item) => item.diet === "veg").map((item) => item.id);return {...state,menuById,menuIdList: {all: allMenuId,veg: vegMenuId,},};}
When LOAD_MENU is dispatched, it’ll send an array of food items in the menu key of payload. We put this array into our store like this-
- Traverse the menu array and store each item by id in menuById object.
- Make an array of ids for all items.
- Make an array of ids for only veg items.
- Return the new state with changes in menuById and menuIdList.
Similarly, we have implemented ADD_TO_CART and REMOVE_FROM_CART. We store data (quantity etc.) for each item by its id inside cartByIds. When user adds an item to cart, the dispatched action gets that item’s id in payload. Then we find the item’s quantity in cartByIds, change it by 1 and again store it.
Link to this headingRedux Store
We make a function in which we create a Redux store, pass the foodReducer to it. We also enable the Redux DevTools extension for better debugging and then export this function.
Then in index.js, we create a store, wrap the App component inside Provider component from react-redux package and pass the store as a prop to the Provider.
// redux.jsconst enableReduxDevTools = window.__REDUX_DEVTOOLS_EXTENSION__?.();export function createReduxStore() {const store = createStore(foodReducer, enableReduxDevTools);return store;}// index.jsimport { Provider } from 'react-redux';import { createReduxStore } from './redux';ReactDOM.render(<Provider store={createReduxStore()}><App /></Provider>,rootElement,);
Link to this headingApp.js file
The App.js file is our top most parent component React renders. The whole file is doing the following stuff —
- Read the diet from store and update it when user toggles the Veg Only checkbox.
- Triggers an API call to load the menu.
- Pass the API status to Message component so user is notified when API is done loading.
- Get the loaded menu from Redux store and pass it to MenuList component.
- Render PaymentFooter component.
Let’s look at how some of these things are done —
Link to this headingDiet Toggler
If user clicks on the Veg Only checkbox then we need to only show the vegetarian items. So we need a way to get the diet value from the store and also update it.
To get data from Redux store, we use the useSelector hook from the react-redux package. The useSelector hook takes a function (selector). This function gets the entire Redux store state as a parameter and its job is to return only the state needed. For this case we only need the diet state.
We get the dispatch function from useDispatch hook and we dispatch an action of type CHANGE_DIET from the handleVegToggle event handler. At last we plug the diet value and the handleVegToggle event handler into the checkbox.
export default function App() {const diet = useSelector((state) => state.diet);const dispatch = useDispatch();function handleVegToggle() {dispatch({type: ACTIONS.CHANGE_DIET,});}return (<div className="food-app">// rest of the code<label><inputtype="checkbox"name="veg-checkbox"value={diet}checked={diet === 'veg'}onChange={handleVegToggle}/>Veg Only</label>// rest of the code</div>);}
Link to this headingAPI Loader
All of the API loading logic is abstracted away into the useLoadFoodData hook. It does two things-
- Track the API loading status in a React state named stateAPIStatus and return it so App component knows about it.
- When API call finishes, dispatch the LOAD_MENU action to store the API data in Redux store.
The code is pretty self-explanatory.
function useLoadFoodData() {const [stateAPIStatus, setAPIStatus] = useState('idle');const dispatch = useDispatch();useEffect(() => {setAPIStatus('loading');loadFoodData().then((data) => {dispatch({type: ACTIONS.LOAD_MENU,payload: {menu: data,},});setAPIStatus('success');}).catch((error) => {setAPIStatus('error');});}, [dispatch]);return stateAPIStatus;}
The App component uses the hook like so
const stateAPIStatus = useLoadFoodData();
We pass stateAPIStatus to Message component which will render an aria live region to notify user when API data is being fetched or if it errors.
Link to this headingDisplay Menu
As we previously saw, useLoadFoodData hook takes care of updating the store with the menu data from API. So now App component can get the menu from store using a selector and pass the data to the MenuList component as a prop.
import { shallowEqual, useSelector } from 'react-redux';export default function App() {const diet = useSelector((state) => state.diet);const menuList = useSelector(selectorMenu, shallowEqual);useEffect(() => {console.log('SERVER_EVENT: menu list changed');}, [menuList]);return (<div className="food-app">// rest of the code<MenuList menuList={menuList} /></div>);}
But you’ll notice that to get diet and menuList we’re using two useSelector and both usage are slightly different. This raises three questions.
- Why are we using a separate selectorMenu instead of inline function?
- Why are we passing shallowEqual function as a second argument to useSelector.
- Why do we need two separate useSelectors in the first place?
The first question has a simple answer, since we stored data in Redux store by id we need to do some simple pre-processing in the selector to return the array of food items with complete details. It is more readable if we keep it in a function outside the component and this way we can also re-use the selector in other components.
We would also need to do this if we were using memoized selectors with something like reselect. More details in the docs.
To answer the next two questions we’ll need to understand selectors in-depth.
Link to this headingRedux Selectors
The function that we pass to useSelector hook as first argument is called a selector. The selectors are run whenever any value in the Redux store changes. But to improve performance Redux does one optimization. It does a referential equality check between the old and new value returned by the selector.
In our diet selector, it was just returning a string. When the store updates, the diet selector runs and then useSelector does this comparison.
const oldDietVal = getOldVal();const newDietVal = selectorMenu(storeState);newDietVal === oldDietVal
If by referential equality, both values are same then useSelector just returns the old value.
Now let’s look at our selectorMenu selector function.
function selectorMenu(state) {const { diet, menuIdList, menuById } = state;const menuId = menuIdList[diet];const menuList = [];menuId.forEach((id) => {menuList.push(menuById[id]);});return menuList;}
First we create a fresh new menuList array. Then we find all the ids for the user’s currently selected diet and then populate menuList with the data of each id. At last we return the menuList array.
But here’s the thing, as we saw Redux only does a referential equality check between the old and new value and in JavaScript.
[] === [] // is always false
That means useSelector will always return the new array. It’s a problem because when we use the returned menuList array in a useEffect or pass it to MenuList child component, React will notice that the array is different from last time and will always update.
Above you’ll notice that when user toggles the Veg Only checkbox then the menuList changes so effect runs like expected but when user adds an item to the cart then there is no perceived change in menuList but still the effect runs and we want to avoid this.
To avoid this performance penalty we can pass a custom comparison function as the second argument to useSelector. In our case we provide the shallowEqual function (from react-redux package). Now useSelector will do a shallow comparison instead of referential equality between the new and old value.
Notice that in the above example, React only triggers updates when user clicks on Veg Only but doesn’t do anything when user adds an item to the cart.
If you understood this then you’d also figure out why we used two useSelector and not return a big object through one useSelector. This kind of selector would have to return an object like this.
{diet: 'veg',menuList: [],}
Since it always returns a new object which also has a newly created menuList array the shallow comparison check will start failing again. To solve this we might provide a deep comparison as the second argument to useSelector but that can be an expensive operation. So its a good idea to just stick with separate selectors for individual states.
Just like we moved away from one componentDidMount to independent useEffects, we need to move away from one mapStateToProps to multiple useSelectors.
Link to this headingConclusion
In the reducer we went through two actions CHANGE_DIET, LOAD_MENU. We dispatched them from components, custom hooks and at last learned how to get data from store using selectors.
The code for integrating UI components with Redux can be found in this Comps.js file on GitHub. In the same file you’ll see how we display the total price in PaymentFooter component. If you liked it share it on Twitter and in your network. It will be a great help.